

Learn how to paint a watercolor landscape with birds. Paint a close up picture of a bird. Use traditional Japanese and Chinese brush techniques.

The
first step I took in planning this lesson was to look at
This is a book of woodblock prints carefully designed to
look like Sumi-e brush paintings. I wanted my students to learn how to emulate
the delicate, sensitive lines of Edo
period Japanese woodblock prints and paintings.
Vincent
Van Gogh loved the varied brush strokes of the Sumi-e
technique. Signs of Japanese influence are
especially obvious in his later drawings and paintings. Click here for
a more detailed account of the influence of Japanese art on Vincent Van Gogh's
painting.

Edo Period Japanese Sumi-e technique brush and ink painting from The Newark Museum, Newark New Jersey
I encouraged my students to try filling their watercolor paintings with lines, dots, interesting brush strokes and textures, instead of simply outlining and coloring.
Click on the link below for more facts and details (and some excellent links to online museums) on the traditional art of Japanese Painting:


 |

Printable worksheet by The Helpful Art Teacher from
|
First we learned the basic elements of a landscape and discussed pictorial space:
Landscapes 101, Depicting Pictorial Space from Rachel Wintemberg on Vimeo.
Click here for my complete art lesson on pictorial space.
Once we learned to create landscapes we were ready to practice painting birds,
using watercolors and thin brushes.
Next, we created textured watercolor landscapes including at least one bird:
Paint birds in a landscape using Japanese brush techniques from Rachel Wintemberg on Vimeo.
I used a pressure sensitive stylus to create a series of quick contour sketches of birds. During this initial practice phase, I did no erasing or correcting. Instead I learned from the process and applied the new knowledge to each successive drawing. My objective was to lay bare for my students the developmental, trial and error, artistic process.
I used a pressure sensitive stylus to create a series of quick contour sketches of birds. During this initial practice phase, I did no erasing or correcting. Instead I learned from the process and applied the new knowledge to each successive drawing. My objective was to lay bare for my students the developmental, trial and error, artistic process.
Materials used to create this video: IPad 3, Jot touch pressure sensitive stylus, Sketchbook Pro and iMovie app
Music from Fantasia sound track
After looking at both Japanese and Chinese ink paintings, my students also painted some close up bird studies, focusing on texture, gesture and movement.
After looking at both Japanese and Chinese ink paintings, my students also painted some close up bird studies, focusing on texture, gesture and movement.

Drawing Process, Capturing a Bird in Flight from Rachel Wintemberg on Vimeo.
Sketchbook Pro Time Lapse, Jot Touch Pressure Sensitive Stylus on iPad 3
The bird lesson was a follow up to a unit on the
painting techniques of Vincent Van Gogh:
Here is a worksheet to help you start inventing
your own landscapes:
How To Paint Like Vincent Van Gogh from Rachel Wintemberg on Vimeo.Tips and Tricks to help you understand his process. The drawings at the very beginning and end are of course Van Gogh's. In between I create a few pictures of my own in an attempt to see through his eyes.
While the students were painting their bird landscapes, I showed them parts of the Van Gogh video and asked them to describe how he filled the spaces in his pictures. Students were then encouraged to experiment with textured brush strokes instead of using a flat 'coloring book' approach. We discussed how the process of creating a picture is different from painting a room and how, when painting a picture, it is sometimes desirable to let your brushstrokes show.
your own landscapes:
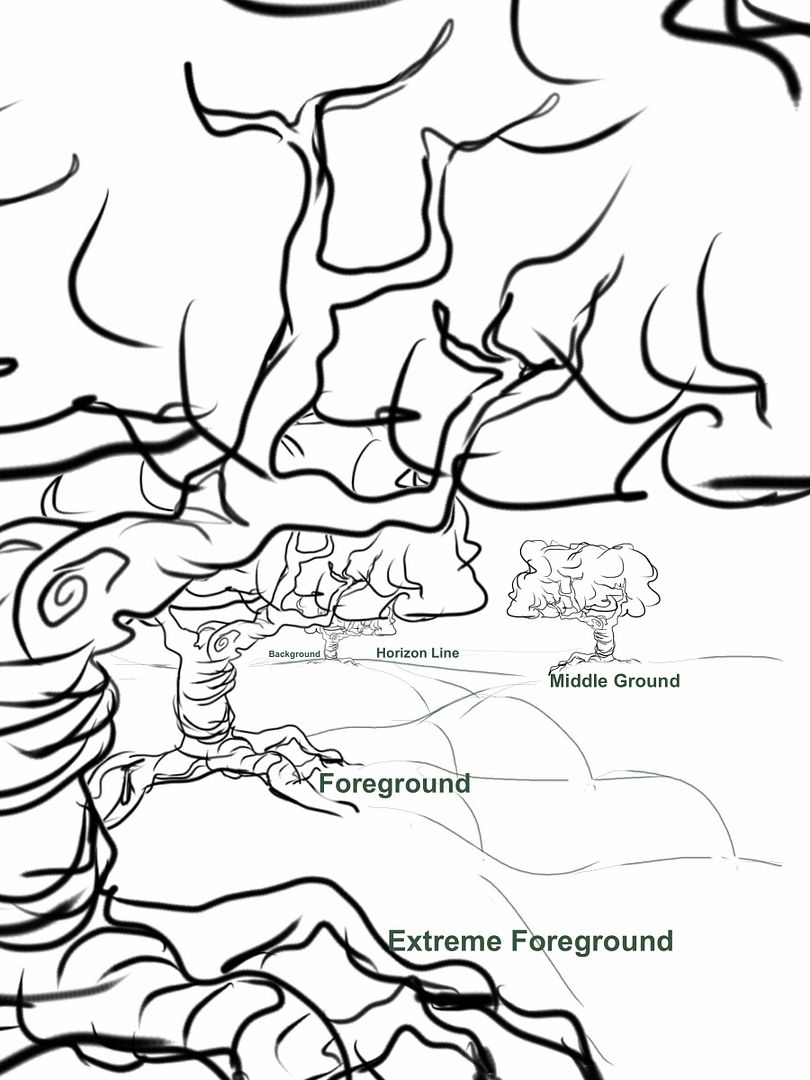 |
Layers of a Landscape, Printable Worksheet By The Helpful Art Teacher,Copyright Rachel Wintemberg 2013
|
Here is a helpful worksheet to get you started drawing birds:
 |
| Printable Worksheet by The Helpful Art Teacher; How to draw birds. Step 1) Observe birds in photographs, on film, in real life and in art Step 2) Identify the underlying tear drop form of the bird's body and the round head. Step 3) Draw these simple underlying forms in various positio and poses based on your observations Step 4) Add beaks, wings, eyes and legs to complete your bird drawings Step 5) Don't forget to observe birds with long legs, long necks and other variations Step 6) Add texture, feathers, color and other details as desired. Step 6) Draw birds swimming, flying, eating and perching to create a sense of dynamic movement. |
If you look carefully at pictures of birds, you will begin to notice the tear drop shape of their bodies. Try copying these forms and then adding beaks, wings and legs.
By the end of the unit each student had created both a picture of a bird in a landscape (with extreme foreground, foreground, middle ground, background, horizon line and overlapping) and a close up painting of a bird (with a dynamic composition and textured brushstrokes).
Here are some of the Chinese brush and ink paintings we looked at from the China online Museum


More useful resources:
We looked at drawings of birds by
artist Debby Kaspari

Plain colored tanager preening by Debby's Kaspari
Here is Debby Kaspari's blog:
We practiced spotting and drawing the underlying
shapes that make up all birds.
We discussed WHY the tear drop form for a bird's body is ubiquitous. Examining the shapes of a flying bird's wings gave us clues about HOW birds fly:


The two photos above come from The Naturalist's Miscellany,copyright 2011,Heather Hinam


 |
| Albrecht Durer, Wing of A Blue Roller |
From careful observation students learned that each part of the bird has a different
size,color and texture of feather and that feathers are arranged in specific patterns.
Each child picked references that appealed to them from a large selection of photographs and paintings.
When painting the close up bird studies, students used the worksheets below as a guide.
Prior to instruction, most students either attempted to create an exact copy of a master painting or placed their subject (in this case a bird) in the center of the page. Using the printable worksheets below, I taught my students how to create original, unique pictures with engaging compositions
 |
Use asymmetrical balance to create compelling photographs and paintings. Worksheet created by The Helpful Art Teacher, 2013, using a Japanese woodblock print book illustration from the Metropolitan Museum of Art's digital library
|
 |
Use the 'rule of thirds' (also sometimes referred to as the 'rule of three')to create dynamic photographs and paintings. Worksheet created by The Helpful Art Teacher, 2013, using a Japanese woodblock print book illustration from theMetropolitan Museum of Art's digital library
Here is a higher resolution image of the illustration.
Try printing it and adding your own grid lines.

Analyze printouts of your favorite paintings to see which ones follow the 'rule of thirds' and which do not.
Print out low resolution black and white versions of famous pictures and draw your grid directly on the image. Make absolutely sure the image you are using has not been cropped!
 
From Line And Form by Walter Crane. Click on the link below to download this free ebook: https://play.google.com/store/books/details?id=ToJAAAAAYAAJ
Click on the link below for a wonderful website with exceptional tutorials and printable step by step instructional worksheets on how to draw realistic birds;http://www.johnmuirlaws.com/drawing-birds/attachment/how-to-draw-birds-2 |
Some ideas for follow up art lessons:

Using the above reference worksheet, from the book Timing For Animation, create an
animation of a bird in flight.
from Rachel Wintemberg on Vimeo.
Students had the opportunity to closely examine the varied textures of bird feathers using my photographs:


A wild bird pauses for a moment, Northern New Jersey, Photo credit; Lyle Booth
One of the wonderful things about art is that there is no one right way to draw a picture. If a group of equally talented artists were to sit down together and copy the same picture of a bird, each drawing would look completely different. To see an amazingly diverse collection of bird pictures by many different artists, click on the link below:
John Gould (1804 – 1881) was an English ornithologist and bird
artist. He published many illustrated books on birds. He has been considered
the father of bird study in Australia. His identification of the birds now
nicknamed "Darwin's finches" played a role in the inception of
Darwin's theory of evolution by natural selection. Gould's work is referenced
in Charles Darwin's book, On the Origin of Species. Source:
Below are some samples of John Gould's illustrations:


The illustrations above were selected from his series of books on hummingbirds.
Below are links to the entire series of hummingbird books. In order to download
or view a specific illustration, just click on the thumbnail:
Compare the work of contemporary artist Iaian MacArthur...


...to these designs from ancient China:


Notice how the artists developed a stylized vocabulary of line and pattern through observation of real birds. Each part of the body has a different type of feather, represented by a different type of line and texture.
Click on the link below to access a collection of bird coloring pages that you can use as a reference for your drawings:
My own artwork: Bird Paintings by Rachel Wintemberg, The Helpful Art Teacher


Student Art gallery
7th grade student Acrylic
Paintings


Children's Gallery
This art lesson is suitable for ages 7 to adult.
These watercolor paintings were created in July of 2012 by 7 and 8 year old children at Camp Horizons in Livingston NJ
 |
Watercolor painting by a 7 year old child at Camp Horizons summer camp, 2012. Close up study of a bird. This student used dry brush watercolor techniques to recreate the texture of feathers. She used asymmetrical balance and positive and negative space (notan) to create a dynamic sense of composition in her painting. The sky was created using a wet on wet technique.
|


 |
Watercolor painting by a 7 year old child at Camp Horizons summer camp, Livingston, NJ, 2012
|
This unfinished painting was created by one of my middle school students:

Unfinished painting.
This student used dry brush techniques to create a sense of texture in her landscape. she used curved brush strokes to create a sense of three dimensional volume in her tree and overlapping to create a sense of depth in her landscape.
This unfinished drawing was created by one of my middle school students.
Beautiful sense of line:

New Jersey Core Curriculum Content Standards that may be applied to this art lesson:
1.1.5.D.1 Identify elements of art and principles of design that are evident in everyday life.
1.1.8.D.2 Compare and contrast various masterworks of art from diverse cultures, and identify elements of the works that relate to specific cultural heritages.
1.3.8.D.1 Incorporate various art elements and the principles of balance, harmony, unity, emphasis, proportion, and rhythm/movement in the creation of two- and three- dimensional artworks, using a broad array of art media and art mediums to enhance the expression of creative ideas
Science Standards:
NJCCCS: 5.1 A-D, 5.2 E
NGSS: PS2A: Forces and Motion; PS2B: Types of Interactions
To participate every April 8th in International Draw A Bird Day (and to learn how the tradition of drawing birds on April 8th got started) click on the link below:
Click on the link below to learn all about birds and bird identification from Cornell University:
What a great collection of resources! I especially like the asymmetrical balance grid. Thank you!!
ReplyDeleteI'll be following with great pleasure!
:)Elizabeth
paintersofdreams.blogspot.com
A beautifully presented lesson and the childrens' art
ReplyDeleteis delightful. I also really liked your helpful and
well documented lesson on Spirals. (with all the flawless
precision involved, it makes one wonder about Mr.Darwin)!
C.P.Robertson
art instructor & painter
robertsongallery.codon'tunderstand "url"
Dear Ms. Robertson, I am blushing! It is a great honor to receive such kind words from such an accomplished person. Thank you.
ReplyDeleteThank you so much for this blog post! I am taking an intro watercolor course and have decided to paint crows. Your section on dynamic composition is very helpful in guiding me where to place my focal point.
ReplyDeleteYou are a genius! Thanks for the lovely post.
ReplyDeleteBody Paint Melbourne
Its amazing blog with lot of great information on bird painting abstract
ReplyDeleteThis is a lovely blog with really helpful stuff on it. Go you!
ReplyDeleteThis is a lovely blog with really cool stuff on it. Go you!
ReplyDeleteWonderful post,Paintings are really awesome.Thanks for sharing.
ReplyDeletebird painting abstract
Awesome post.
ReplyDeleteSaved as a favorite, I like your blog!
ReplyDelete