For the first part of this lesson click here
WHY WATERCOLORS?
Here is my landscape painting so far:
 |
| I have started to add color to the foreground. The only colors I have used so far are green, blue and yellow. |
Since I teach middle school art, I deliberately used a set of student grade, non-toxic watercolors, which I borrowed from my classroom.
I used cold press watercolor paper. I suggest you get an inexpensive pad of watercolor paper since ordinary drawing paper tends to pill and fall apart when it gets wet.
I mixed the watercolors with water in a mixing tray to create transparent glazes of color:
I used a range of analogous colors from blue to yellow-green. Please see my post Color theory 101 if you don't know what analogous colors are.
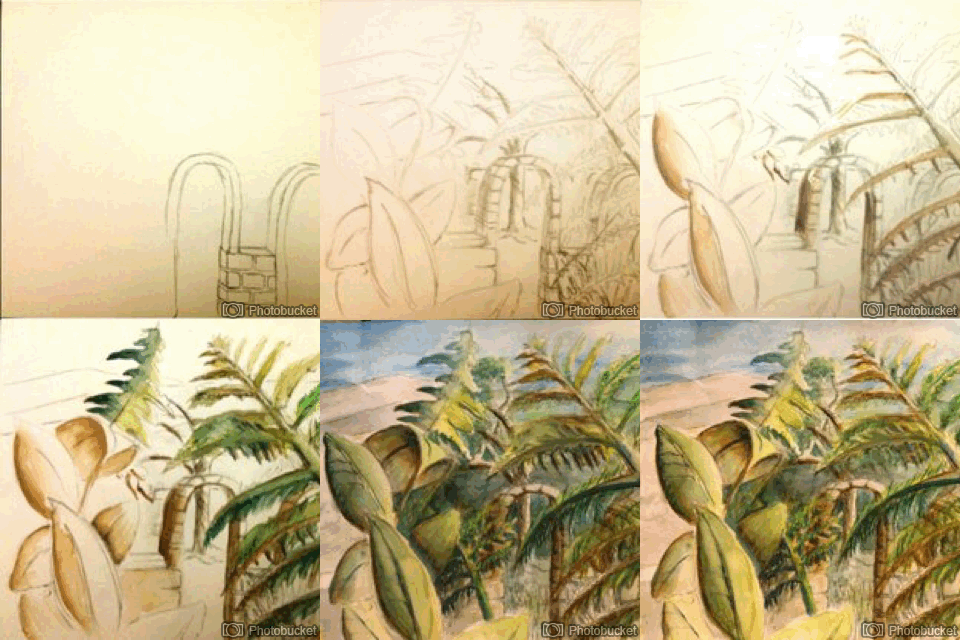
Here is a step by step presentation of the development of my painting so far:
You will need to click on the double arrows to advance the frames and watch the development of the painting.
I used yellow-green on the right side of the ferns and blue green on the shadow side.
I blended the colors by painting water between them.
I painted my colors right over the under-painting.
Because I used transparent glazes, the shadows that I created, in the previous lesson (Watercolors:painting a landscape 101 ) are visible through the paint.
Click your mouse on the double arrows to advance the slide show and follow the development of this painting so far.
When creating a landscape, put brighter colors in the foreground and more muted, faded colors in the background,
Use the printout below as a general guide.
When using transparent watercolors, use water to lighten your paint.
A small amount of black mixed with water will dull your colors and make them appear to fade. Use lighter and more muted colors the farther into the background you go, by adding enough water to make the paint transparent along with small amounts of blue and small amounts of black or brown. Look below at the painting in progress, as color is added.
Here is the process from beginnig to end, step by step
The slide show above chronicles the entire process I used to create this painting. It uses a flash player. If you have a mobile device that does not have flash, please click on this link:
Please watch the time lapse video below to see how I completed a similar picture. This time the light is coming from the upper left hand corner. The sunlight is coming from off of the edge of the page, to create chiaroscuro.
Step 1) Gather reference photographs
The best reference pictures are those you have taken yourself. I took the photos above in 2012 at Olympic National Park in Washington.
 |
| I took this picture walking around my neighborhood. |
Step 2) Observe the photographs, synthesize your ideas (most artists call this doodling or sketching) and create (draw) your original landscape. Include an extreme foreground, foreground, middle ground and background. Consider showing bits of sky, visible through the trees. You do not have to draw an actual horizon line but you should be aware of where the earth meets the sky, even if the line is hidden by the foliage.
Step 3)Select a light source that is off of the paper and block in shadows (no corner suns or visible light source for this assignment. The sun must be off of the edge of the paper).
Step 4) Add brighter colors to the extreme foreground and foreground
Step 5) Add more muted, watered down colors to the background. Leave the white of the paper showing for highlights.
Save final touch ups and detail work for the next day when your picture is dry and you can look at it with fresh eyes.
Select subject matter that fascinates you and take photographs often. Try photographing landscapes up close to capture details. Try photographing from unusual angles. Play around with the exposure, saturation and contrast on your photographs. Take pictures at various times of day and in different types of light. Do not worry if many of your paintings or photographs are similar. All great painters developed their ideas by working on a series of very similar pictures.Here is another 'work in progress' watercolor painting of mine.I am using the same collection of photographs for inspiration as I continue to develop my ideas.


hey,
ReplyDeleteI just clicked on your comment on the blog is dead and it brought me here. I was looking for how it sent traffic to my site as well.
P.s. I will be back to visit your site and leave a real comment but for now I am going to bed.
~Felicia Follum
feliciafollum.weebly.com
feliciafollumphotography.blogspot.com
Enjoyed reading this, very good stuff, regards.
ReplyDelete