
Before reading this article, click here for a complete list of supplies you can use for this and other 'Helpful Art Teacher' drawing projects.
If you cannot afford or are unable to obtain any art supplies, please watch the video below. It explains how you can use common household materials to create a still life painting. You can create beautiful paintings without a paintbrush, paper or even paint.


For this still life, I used a Q-tip, a sharpened chopstick, a number 2 pencil, damp coffee grounds, instant coffee and a the inside of a flattened white cardboard box (from food or medication) instead of traditional paper.
THE GEOMETRY OF ART

 |
| Cylinder, Torus, Cone, Cube and Sphere Once you learn how to draw these forms you will be able to combine them to draw most other forms |
The picture above illustrates the five basic three dimensional forms. If you can learn to draw, overlap and shade these forms you will be well on your way to being able to draw any still life.
 |
| First let's practice overlapping |
 |
| Now let's add some shadows |
 | ||
Don't forget to add the cast shadow on the table top
|

Assignment:
1)Print out the black and white gray scale pictures above and practice copying, overlapping and shading the shapes.
2) Print out two copies of the gray scale still life below and identify the five basic three dimensional forms.

Take a black marker and outline all the basic forms.
Now try to create a contour line drawing of the still life.
Finally shade in your drawing using an HB, 2B and 6B pencil to create a full range of tones.
 |
| blend your tones, using a paper blending stump, to create a full gray scale. |
 |
| Gray scale |
3) Use colored pencil to add color to your still life. Color lightly right over your shadows so that the shading shows through the color.
You can also color your still life with transparent washes of watercolor or acrylic paint. Create a transparent wash by mixing your paint with water or acrylic medium. Test your wash on a piece of newspaper. If you can still read the newspaper through the paint, the wash is transparent. This is very important because you do not want to accidentally hide all your pencil shading.
Congratulations! You are done practicing. Now it's time to create your own masterpiece!
Creating your own still life
Find objects that are similar to the five basic three-dimensional forms and arrange them on a table top.
Make sure to group them together and overlap them to give your still life a sense of depth.
Set up a lamp on one side of your still life. Do not draw the lamp when you draw your still life. Just draw, shade and color the three dimensional forms and the cast shadow on the table.
HELPFUL HINT:How to draw a cylindrical form in two-point perspective.
First, read my other lessons in this website on one and two point perspective.
Remember, whenever you need to draw something in perspective, start out by drawing the box it came in.
First draw the box below the horizon line using two point perspective. Click here to learn how.

Next, look at the top surface of the box. You can find the center of your circle by drawing an 'X' from each corner of the top face of the box. The 'X' intersects at the center.
Now, find the middle of each side of the rectangle. You can estimate. Draw the ellipse (for the top of your cylinder) so that the edges of the shape just touch the center of each side of the box, like this:

Draw the vertical lines for the sides of your cylinder, then connect them with a curved line.
The curved line at the bottom of your cylinder should just touch the center of the two sides that form the bottom edge of your box, as shown below:


 Don't forget to add a highlight as a finishing touch:


Now, find the middle of each side of the rectangle. You can estimate. Draw the ellipse (for the top of your cylinder) so that the edges of the shape just touch the center of each side of the box, like this:

Draw the vertical lines for the sides of your cylinder, then connect them with a curved line.
The curved line at the bottom of your cylinder should just touch the center of the two sides that form the bottom edge of your box, as shown below:

Erase the guide lines:

Add shadows. Don't forget the cast shadow on the surface of the table. Without it, your cylinder will look as if it is floating.


Now let's take a second look at Monet's still life:
Here is Monet's original painting:
...And here is a diagram that shows just the underlying geometric forms (in this case, cube, sphere and torus)
 |
Here is a copy of Monet's picture with an overlay of the diagram

The key to drawing any still life is to first look for the underlying geometric forms and then lightly sketch them on to your paper. Once you have drawn the geometric forms and blocked in the shadows, you can easily concentrate on the other details.
click here for an excellent website by a math teacher on the geometry of 3-D drawing from The Math Forum at Drexel University.
In the illustration below Walter Crane includes the pyramid and hexagon in the basic three dimensional forms.


To learn about other ways that artists think about shape, click on the link below:
Some helpful worksheets


Shading a Still Life from Rachel Wintemberg on Vimeo.
Students were able to set up their own still lifes by choosing from these objects on my window sill or bringing in their own from home. They worked in groups to set up something they could all draw from different seats. Each table created their own compositions.
Does your composition fill the page?
Did you use overlapping, that is, do the objects in front partially hide the objects in the back?
Did you place objects in the front lower on the page than objects that are farther away to create a sense of pictorial space (background, middle-ground and foreground)?
Is your picture detailed, accurate and neatly drawn?
Is your shading consistent throughout the picture so that the direction of the light source obvious?
Did you keep in mind that light travels in a straight line?
Did you include cast shadows on the table surface?
Did you use curved lines to emphasize round forms and straight lines to emphasize flat surfaces?
Did you include highlights, mid-tones and shadows?
.
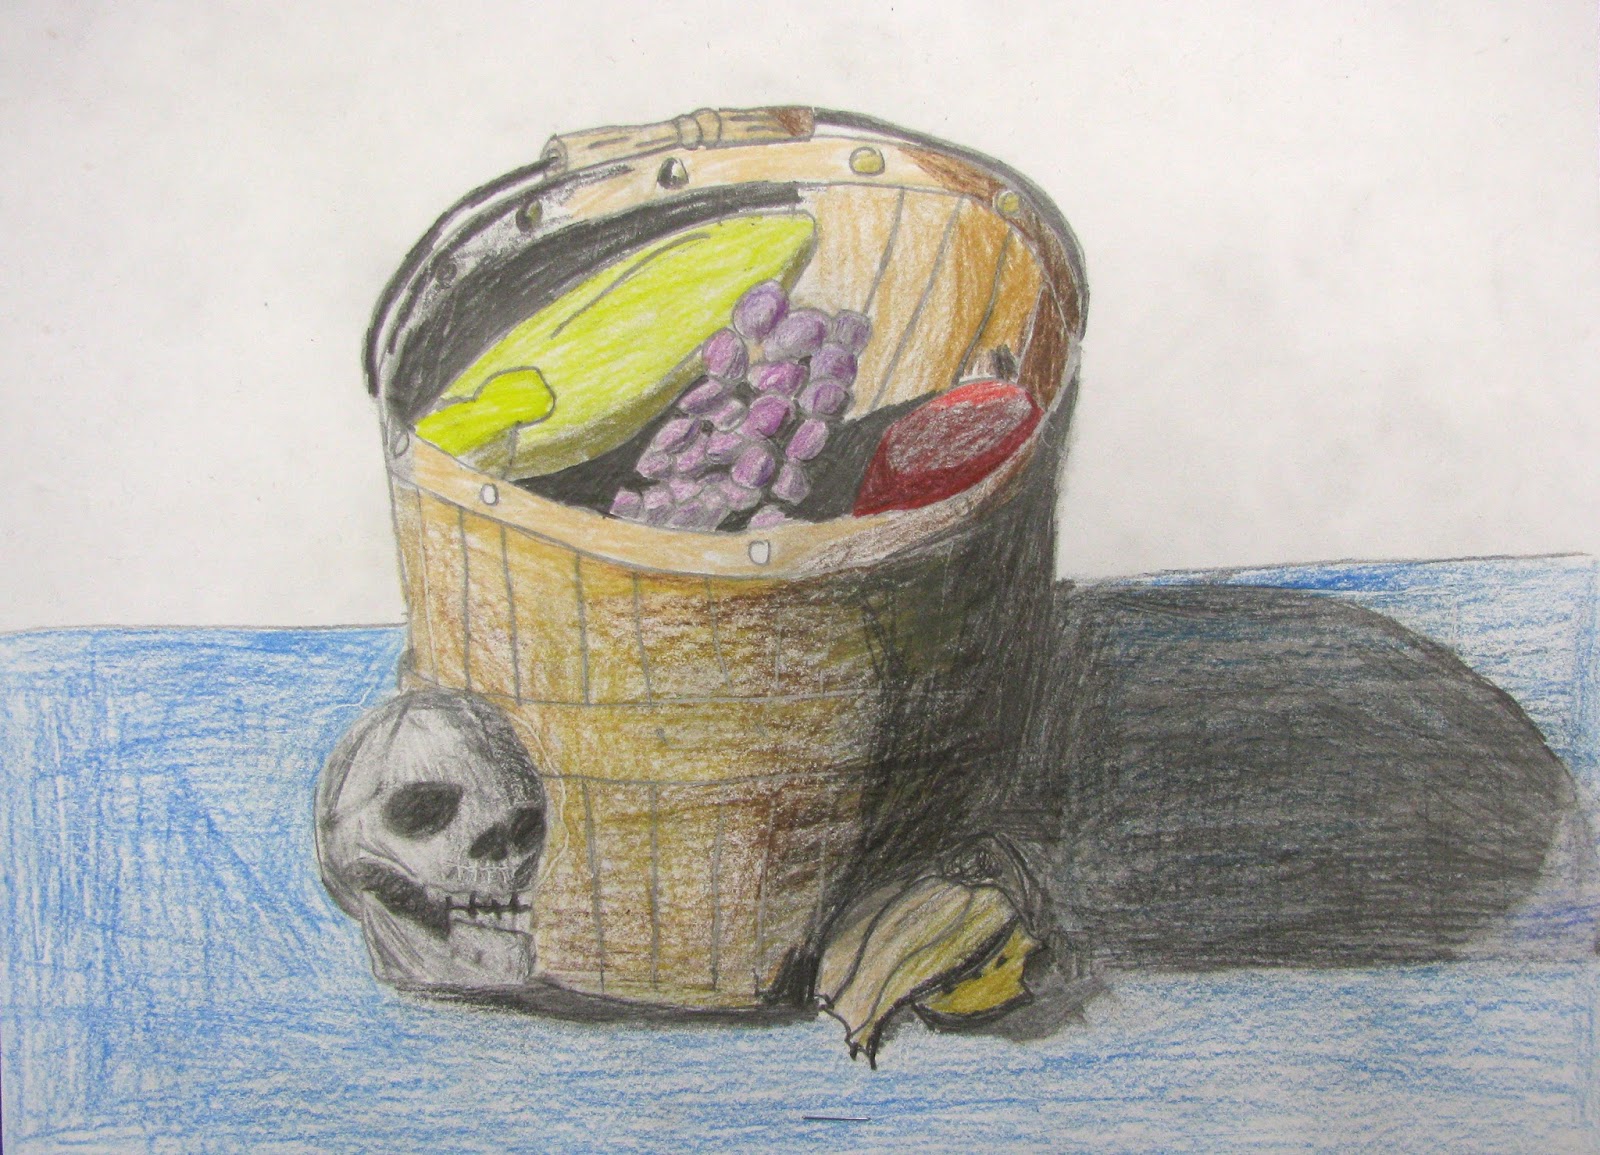
The students below shaded their artwork with pencil and then colored lightly with colored pencil, so that the highlights and shadows showed through the transparent colors.
STUDENT ART GALLERY


Scaffolding the lesson: How to teach students to draw what they see
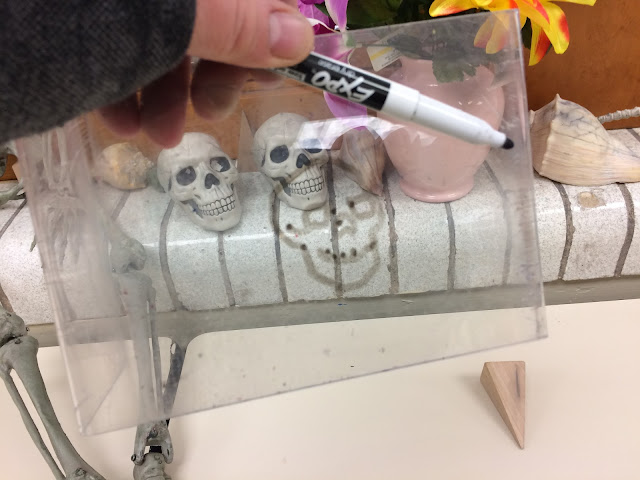
One way to help students to draw what they see is to have them look at and trace the image, using an expo marker, onto an acetate frame with one eye closed. This also helps in demonstrating how overlapping works and how objects closer to the viewer appear closer to the bottom of the page, while farther away objects appear higher.
 Another way to help students learn how to draw what they see is to have them practice 'blind contour line drawing'. In a blind contour drawing the student keeps their eye on the object they are trying to draw and is not allowed to look at their paper until they are done. Poking the pencil through a sheet of construction paper helps them to resist the temptation of sneaking a peek. The drawing is done in one continuous line without lifting the pencil from the page.
We spent an entire class period doing these practice exercises before moving on to our final still life compositions.
How to get an 'A':
We spent an entire class period doing these practice exercises before moving on to our final still life compositions.
Does your composition fill the page?
Did you use overlapping, that is, do the objects in front partially hide the objects in the back?
Did you place objects in the front lower on the page than objects that are farther away to create a sense of pictorial space (background, middle-ground and foreground)?
Is your picture detailed, accurate and neatly drawn?
Is your shading consistent throughout the picture so that the direction of the light source obvious?
Did you keep in mind that light travels in a straight line?
Did you include cast shadows on the table surface?
Did you use curved lines to emphasize round forms and straight lines to emphasize flat surfaces?
Did you include highlights, mid-tones and shadows?
.
The students below shaded their artwork with pencil and then colored lightly with colored pencil, so that the highlights and shadows showed through the transparent colors.
STUDENT ART GALLERY


bRILLIANT
ReplyDeleteThis is lovely! So much to learn, and the scaffolding!
ReplyDelete