Vejigante
Before reading this article, click here for a complete list of useful art supplies (with ordering information) that you can use to build your own marvelous mask.
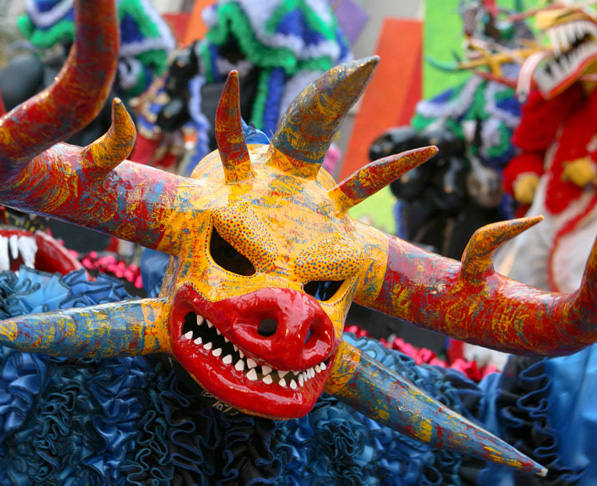
The masks are linked to many festivals that continue today, especially in Puerto Rico, in the cities of Loíza and Ponce and in the Dominican Republic in the city of Punta Cana.
To learn more about Vegigante masks, click here.
To learn more about the carnival masks of the Dominican Republic, click here.
To see an art gallery of Dominican masks, click here.
To learn more about the carnival masks of the Dominican Republic, click here.
To see an art gallery of Dominican masks, click here.


MASKS BY SAMUEL E. SHULL MIDDLE SCHOOL STUDENTS


MASKS BY McGINNIS MIDDLE
SCHOOL STUDENTS
SCHOOL STUDENTS
To illustrate the strong African influence on the Caribbean Vejigante masks I have created the slide show below. The first six masks in the presentation are African. The remaining masks are Puerto Rican and Dominican. How are the African masks the same as the Caribbean ones?
How are they different?
How are they different?
Imagine that you lived a long, long time ago, when slavery was still legal throughout the Spanish empire. Now imagine that you are an African mask maker. You are a skilled artist and a well respected member of your community. One day you are kidnapped and brought to Puerto Rico as a slave. While in Puerto Rico you meet native Puerto Ricans (Taíno people). You also learn about Spanish traditions and customs, like Carnival.
You do not have access to the same materials that you had back in Africa. Instead of wood and gold and animal horns you must find new art supplies. You wonder; is it possible to create a mask out of the shell of a coconut?
Slaves were not allowed to openly practice their traditions. By applying their craft to European celebrations, such as Carnival, they were able to covertly keep their art alive. When different cultures come together, new ideas blossom. The Vejigante mask is a unique and beautiful Caribbean art form. Slavery and Spanish colonialism may be part of the Caribbean's distant past, but the tradition of the Vejigante lives on.
PRINTABLE WORKSHEETS
 *The information in the worksheet above came from: http://www.exitstudio.com/web-content/pages/vejiloiza.html


When you are done constructing the head and horns of your Vejigante mask, think about how you would like to construct the mouth. Do you want to cut a hole for the mouth or construct a three dimensional animal snout?
Click here to search Google for images of Vejigante masks. Notice the incredible variety of forms and colors. The only limit is the artist's imagination.
Click here to search the American Museum of Natural History anthropology collections data base for images of masks from around the world.
Design your own unique mask. Be as creative and inventive as possible.
After you are done constructing your own three dimensional oak tag mask, you may cover it with papier mache' or Paris Craft. First, get some tin foil and wrap it around every detail of your mask so that no oak tag is showing. Do this neatly so that you can still clearly see the form of your mask. Next, loosely crumple up newspaper starting at the corners so that one side of the newspaper ball is smooth. Put a piece of masking tape over the crumpled side so that the ball holds it's form and then tape it temporarily to the inside of your mask. The tin foil will keep the oak tag from getting soggy as you apply the plaster bandages or papier mache. The newspaper will keep the mask from collapsing under the weight of the plaster.
Have students cut small strips of the plaster craft while it is still dry. I use large wash basins for this to minimize the mess. I also keep a separate set of scissors in my classroom just for working with plaster craft. Dip each piece of bandage into water and then lay it carefully on the tin foil covered mask. Smooth it out immediately, until the edges lay flat and none of the holes in the cloth are showing. Plaster craft is made from open weave cheese cloth impregnated with plaster and it is important to smooth the plaster before it dries. Once the plaster comes into contact with water, you only have a limited time to work with it before it sets permanently. It cannot be wet again and smoothed out later. Continue to apply the bandages, overlapping and crisscrossing them, smoothing as you go.
Wrap the edges of the bandages neatly around the edges of the mask and around any openings, such as the eyes. Allow your mask to dry over night.
Warning, do not dump any left over plaster down the drain! It will clog up the pipes. Instead, allow it to settle to the bottom of your water containers, pour off the clear water and put the sediment in the garbage.
The next day you may take clay, play dough or Crayola Model Magic and add any details you want to your mask. You may also crumple up tin foil and tape it onto your mask to create additional details such as another horn or some teeth. When you are done simply add another coat of Paris craft over the entire mask, covering both your first coat and your new details. Once again, allow the mask to dry over night.
Once the mask is dry, coat the entire surface with a smooth layer of thick modeling paste. Since this is the final surface of the mask before you paint the color, make sure that it is smooth, neat and covers any remaining holes in the plaster craft bandages. Paint the modeling paste over all visible parts of the mask. Modeling paste, available in art supply stores, creates smooth textured surface on the mask by filling in all the holes in the plaster bandages. It is also a lightweight method of strengthening your mask.
You can also easily make papier mache using ripped up newspaper and a flour and water paste. Diluted white glue or diluted wall paper paste also work well. Dip the ripped up (not cut) newspaper strips in the paste and then plaster them to the form. Overlap the strips of paper. The ripped edges will help the papier mache' stick to each other and form a smooth surface. Again, you will want to make sure the mask is covered with tin foil and stuffed temporarily with newspaper in order to keep the armature from becoming soggy and collapsing during the papier mache process.
We have also created ceramic masks, which are fired and glazed. Here is a short video I created explaining how:
PAINTING YOUR MASK
We painted our masks using acrylic paint. After allowing the paint to dry, we added a final clear coat of Mod Podge or acrylic gloss medium. Most students took two or three class periods to paint their masks. On the second day they added details with smaller paint brushes and they added the clear varnish coat on the last day. The most successful designs used symmetrical patterns and a simple graphic contrasting color scheme, as demonstrated in the slide show below:
You do not have access to the same materials that you had back in Africa. Instead of wood and gold and animal horns you must find new art supplies. You wonder; is it possible to create a mask out of the shell of a coconut?
Slaves were not allowed to openly practice their traditions. By applying their craft to European celebrations, such as Carnival, they were able to covertly keep their art alive. When different cultures come together, new ideas blossom. The Vejigante mask is a unique and beautiful Caribbean art form. Slavery and Spanish colonialism may be part of the Caribbean's distant past, but the tradition of the Vejigante lives on.
PRINTABLE WORKSHEETS

Click here to search Google for images of Vejigante masks. Notice the incredible variety of forms and colors. The only limit is the artist's imagination.
Click here to search the American Museum of Natural History anthropology collections data base for images of masks from around the world.
Design your own unique mask. Be as creative and inventive as possible.
After you are done constructing your own three dimensional oak tag mask, you may cover it with papier mache' or Paris Craft. First, get some tin foil and wrap it around every detail of your mask so that no oak tag is showing. Do this neatly so that you can still clearly see the form of your mask. Next, loosely crumple up newspaper starting at the corners so that one side of the newspaper ball is smooth. Put a piece of masking tape over the crumpled side so that the ball holds it's form and then tape it temporarily to the inside of your mask. The tin foil will keep the oak tag from getting soggy as you apply the plaster bandages or papier mache. The newspaper will keep the mask from collapsing under the weight of the plaster.
Have students cut small strips of the plaster craft while it is still dry. I use large wash basins for this to minimize the mess. I also keep a separate set of scissors in my classroom just for working with plaster craft. Dip each piece of bandage into water and then lay it carefully on the tin foil covered mask. Smooth it out immediately, until the edges lay flat and none of the holes in the cloth are showing. Plaster craft is made from open weave cheese cloth impregnated with plaster and it is important to smooth the plaster before it dries. Once the plaster comes into contact with water, you only have a limited time to work with it before it sets permanently. It cannot be wet again and smoothed out later. Continue to apply the bandages, overlapping and crisscrossing them, smoothing as you go.
Wrap the edges of the bandages neatly around the edges of the mask and around any openings, such as the eyes. Allow your mask to dry over night.
Warning, do not dump any left over plaster down the drain! It will clog up the pipes. Instead, allow it to settle to the bottom of your water containers, pour off the clear water and put the sediment in the garbage.
The next day you may take clay, play dough or Crayola Model Magic and add any details you want to your mask. You may also crumple up tin foil and tape it onto your mask to create additional details such as another horn or some teeth. When you are done simply add another coat of Paris craft over the entire mask, covering both your first coat and your new details. Once again, allow the mask to dry over night.
Once the mask is dry, coat the entire surface with a smooth layer of thick modeling paste. Since this is the final surface of the mask before you paint the color, make sure that it is smooth, neat and covers any remaining holes in the plaster craft bandages. Paint the modeling paste over all visible parts of the mask. Modeling paste, available in art supply stores, creates smooth textured surface on the mask by filling in all the holes in the plaster bandages. It is also a lightweight method of strengthening your mask.
You can also easily make papier mache using ripped up newspaper and a flour and water paste. Diluted white glue or diluted wall paper paste also work well. Dip the ripped up (not cut) newspaper strips in the paste and then plaster them to the form. Overlap the strips of paper. The ripped edges will help the papier mache' stick to each other and form a smooth surface. Again, you will want to make sure the mask is covered with tin foil and stuffed temporarily with newspaper in order to keep the armature from becoming soggy and collapsing during the papier mache process.
We have also created ceramic masks, which are fired and glazed. Here is a short video I created explaining how:
PAINTING YOUR MASK
We painted our masks using acrylic paint. After allowing the paint to dry, we added a final clear coat of Mod Podge or acrylic gloss medium. Most students took two or three class periods to paint their masks. On the second day they added details with smaller paint brushes and they added the clear varnish coat on the last day. The most successful designs used symmetrical patterns and a simple graphic contrasting color scheme, as demonstrated in the slide show below:
Watch the video below to learn how the contemporary artist Roberto Zach Castro started out tagging graffiti as a teenager. One day, he met an art teacher who recognized his talent and helped him to develop his skills. Now he creates beautiful unique Vejigante masks out of recycled materials. He also teaches the children of his community how to make these special masks for the annual Carnival parade. He feels that it is important for the next generation to take pride in Puerto Rico's rich cultural heritage.
Modern Dominican and Puerto Rican mask makers use traditional papier mache' techniques or carve their masks from coconut shells and husks. Papier mache' has the advantage of being an extremely light weight and inexpensive art medium. Why is it important to be able to make light weight masks?
In this last video you will see the contemporary mask maker, Raul Ayala of Loiza, Puerto Rico, at work as traditional music plays in the background. Mr. Ayala is practicing the ancient craft of constructing Vejigante masks from coconut husks. These skills have been handed down to him from generation to generation, dating back to colonial times when African people were first brought to Puerto Rico in chains in the hold of slave ships.
At the carnival in Loiza people dance to the African rhythms
of bomba and plena music through the streets. To learn
more about bomba and plena music and it's importance in
The Vejigantes lead the crowds in 'call and response'
chants or 'plena'. Everyone knows the words to these
traditional rhythms and sings along. To learn more about
traditional Puerto Rican call and response chanting and the
African traditions that inspired it, click here.
click here to see African masks from the Yoruba culture.
How are the Yoruban masks similar to Raul Ayala's coconut
mask? How are they different?
Raul Ayala's masks are influenced by his multicultural past
and family traditions. What traditions will influence the
masks you create?


