Welcome to The Helpful Art Teacher, an interdisciplinary website linking visual arts to math, social studies, science and language arts.

Learning how to draw means learning to see. A good art lesson teaches us not only to create but to look at, think about and understand our world through art.

Please click on my page to see my personal artwork and artist statement: http://thehelpfulartteacher.blogspot.com/p/the-art-of-rachel-wintembe.html

Please contact me at thehelpfulartteacher@gmail.com. I would love to hear from you.

Wednesday, December 29, 2010

Basic elements of three dimensional form continued


THE PLATONIC SOLIDS
Cube with magic ribbons 
M.C. Escher

A Platonic Solid is a three dimensional  shape where
each face is the same regular polygon and the same number of polygons meet at each corner

For example a cube is a Platonic Solid because each side is made of an identical square and three squares meet at each corner.

The five platonic solids are:


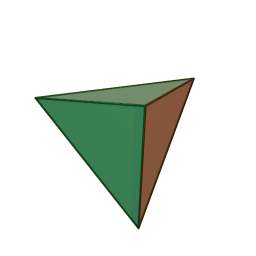
Click here for a printable pattern to build your own tetrahedron


Click here for a printable pattern to build your own cube


Click here for a printable pattern to build your own octahedron


Click here for a printable pattern to build your own dodecahedron


Click here for a printable pattern to build your own icosahedron
Spinning forms courtesy of Wikimedia Commons

Design your own polyhedron by printing out and combining the geometry nets (paper patterns) above.


Common Core Math Standards for this activity:

6.G.4 - Represent three-dimensional figures using nets made up of rectangles and triangles


Examples of Platonic Solids and other polyhedra in art:

Reptiles
M. C. Escher

Metamorphosis I M. C. Escher


Photobucket Pictures, Images and Photos
Jost Amman (1539-1591) FOUR PLATES FROM PERSPECTIVA,
 Engravings,Cooper-Hewitt Museum

Kepler's Platonic solid model of the Solar system, 1600 
  For more information about the platonic solids in art and architecture click here


Click here to read my post on tessellations and then
      7) click here to find out how you can build a three-dimensional dodecahedron tessellation.  Can you design and build tessellations out of the other platonic solids?


Can you find a connection between the reason regular polygons can form tessellations and the reason they can form the five platonic solids?

<>

Toothpick and Crayola Model Magic sculpture
Playground design by third grade girl (age 9)

Directions:


Using 6 toothpicks and small, pea sized, pieces of Crayola
Model Magic, create a model of a tetrahedron.

 If you don't have Model Magic you can create your own clay, using white bread and ordinary white glue. To learn how to  make home made clay, click here.


Add three more toothpicks to form a second tetrahedron.

Continue to add toothpicks, three at a time to build your structure.

Create a tower consisting entirely of tetrahedrons. See how tall a tower you can build.

For an additional challenge, make your tower symmetrically balanced. 


Some other ideas:

Build a toothpick city with your friends.

 Click here for some amazing toothpick city ideas.

Click here to find out how you can enter a toothpick sculpture building contest.

Have a bridge building contest.
Click here  and here for more information on bridge building in your classroom. 
Click here to download free bridge design software from West Point Military Academy. Click here for information on West Point's annual bridge design contest.
To learn how to create a realistic drawing of a suspension bridge, using three-point perspective, click here.

Click here to see how students combined polyhedra to create some amazing structures

Watch this video to learn how one artist spent 35 years constructing a really cool toothpick sculpture of San Francisco. It all started when he was 8 years old and learned how to build toothpick sculptures in school.


Where will your inspiration take you?


RELATED ART HISTORY
Monument to the Third International
By Vladimir Tatlin

Learn more about the Monument to the Third International by clicking here

Learn more about Vladimir Tatlin by clicking here

Tatlin conceived of the idea for the tower after visiting Paris.

He was inspired by seeing the Eiffel tower.


"The Eiffel Tower, a 19th century iron lattice tower is one of the most recognizable structures in the world. It is the tallest building in Paris, and the single most visited paid monument in the world; millions of people ascend it every year. Named after its designer, engineer Gustave Eiffel, the tower was built as the entrance arch for the 1889 World's Fair."* Can you find the triangular bracing that Gustave Eiffel used to make his structure more stable?
"It was the tallest structure in the world from its completion until 1930, when it was eclipsed by the Chrysler Building in New York City."*
Before the Eiffel Tower, architects and Engineers commonly hid the underlying structures of their buildings beneath wood or stone.  When people first saw the Eiffel tower they thought it was ugly, like a building without any ‘skin’. 
*(Information on the Eiffel Tower courtesy of www.wikipedia.org)

Tatlin was also inspired by visiting Pablo Picasso in his studio in Paris.

Drawing of Paul Eluard by Pablo Picasso

Picasso and his friend Georges Braque invented a type of art called ‘cubism’.  This cubist drawing simplifies the human face into straight lines and geometric shapes
Once photography became widely available, artist no longer felt the need to faithfully copy nature. Instead they began to experiment and express their ideas in new ways.  Many people thought Cubist pictures were ugly and did not like the new paintings. 

Something to think about: Decades before the invention of the modern computer (or video game) Pablo Picasso and Georges Braque began simplifying the human face into  straight lines and geometric forms, in much the same way 3D computer animators do today.
Does technology inspire art or does art inspire  technology? The answer is; both. The two are inseparable.

To see how one contemporary artist used modern wire frame technology to create this three dimensional cubist style paper head click here. 


Questions for discussion:
 
    1)   Why do you think Tatlin's tower was never built?
    2)    What made the Constructivists different from other sculptors?
         3)   Why do you think a building might be more stable if the designer used triangular braces? How can triangular bracing keep a building from collapsing?
         4)  Describe the Geometric forms that Tatlin was planning to place within the tower. What shapes did he choose and what were they supposed to symbolize?
        5)   Where did the Constructivists get their ideas from?
        6)   At the time when Vladimir Tatlin designed his monument, what building was the tallest building in the world?
        7)   How do you think Gustave Eiffel was able to create such a tall building without it collapsing? What technique was used by both Vladimir Tatlin and Gustave Eiffel?
        8)   How big would the Monument to the Third International have been, had it been built?
        9)   What do you think would happen if you tried to build a tall toothpick structure out of cubes instead of tetrahedrons?
       10) Give some examples of how artists can get ideas from other people who came before them.

Monday, December 27, 2010

Drawing the five basic three-dimensional forms: Still life 101


Before reading this article, click here for a complete list of supplies you can use for this and other 'Helpful Art Teacher' drawing projects.

If you cannot afford or are unable to obtain any art supplies, please watch the video below. It explains how you can use common household materials to create a still life painting. You can create beautiful paintings without a paintbrush, paper or even paint.


For this still life, I used a Q-tip, a sharpened chopstick, a number 2 pencil, damp coffee grounds, instant coffee and a the inside of a flattened white cardboard box (from food or medication) instead of traditional paper. 


THE GEOMETRY OF ART


Cylinder, Torus, Cone, Cube and Sphere

Once you learn how to draw these forms you will be able to combine them to draw most other forms
The picture above illustrates the five basic three dimensional forms. If you can learn to draw, overlap and shade these forms you will be well on your way to being able to draw any still life.

First let's practice overlapping


Now let's add some shadows


Don't forget to add the cast shadow on the table top

Printable shading worksheet


Assignment:

1)Print out the black and white gray scale pictures above and practice copying, overlapping and shading the shapes.


2) Print out two copies of  the gray scale still life below and identify the five basic three dimensional forms.


Take a black marker and outline all the basic forms.
Now try to create a contour line drawing of the still life.
Finally shade in your drawing using an HB, 2B and 6B pencil to create a full range of tones.


blend your tones, using a paper blending stump,
to create a full gray scale.

Gray scale


3) Use colored pencil to add color to your still life. Color lightly right over your shadows so that the shading shows through the color.

You can also color your still life with transparent washes of watercolor or acrylic paint. Create a transparent wash by mixing your paint with water or acrylic medium. Test your wash on a piece of newspaper. If you can still read the newspaper through the paint, the wash is transparent.  This is very important because you do not want to accidentally hide all your pencil shading.

Congratulations! You are done practicing. Now it's time to create your own masterpiece!


Creating your own still life
Find objects that are similar to the five basic three-dimensional forms and arrange them on a table top.

Make sure to group them together and overlap them to give your still life a sense of depth.


Set up a lamp on one side of your still life. Do not draw the lamp when you draw your still life. Just draw,  shade and color the three dimensional forms and the cast shadow on the table.

HELPFUL HINT:How to draw a cylindrical form in two-point perspective.


First, read my other lessons in this website on one and two point perspective.

Remember, whenever you need to draw something in perspective, start out by drawing the box it came in.


First draw the box below the horizon line using two point perspective. Click here to learn how.


Next, look at the top surface of the box. You can find the center of your circle by drawing an 'X' from each corner of the top face of the box. The 'X' intersects at the center.

Now, find the middle of each side of the rectangle. You can estimate. Draw the ellipse (for the top of your cylinder) so that the edges of the shape just touch the center of each side of the box, like this:


Draw the vertical lines for the sides of your cylinder, then connect them with a curved line.
The curved line at the bottom of your cylinder should just touch the center of the two sides that form the bottom edge of your box, as shown below:

Erase the guide lines:
Add shadows. Don't forget the cast shadow on the surface of the table. Without it, your cylinder will look as if it is floating.
Don't forget to add a highlight as a finishing touch:
Now let's take a second look at Monet's still life:

Here is Monet's original painting:


...And here is a diagram that shows just the underlying geometric forms (in this case, cube, sphere and torus)

Here is a copy of Monet's picture with an overlay of  the diagram
 

The key to drawing any still life is to first look for the underlying geometric forms and then lightly sketch them on to your paper. Once you have drawn the geometric forms and blocked in the shadows, you can easily concentrate on the other details.


click here for  an excellent website by a math teacher on the geometry of 3-D drawing from The Math Forum at Drexel University.

In the illustration below Walter Crane includes the pyramid and hexagon in the basic three dimensional forms.
To learn about other ways that artists think about shape, click on the link below:

Some helpful worksheets


Shading a Still Life from Rachel Wintemberg on Vimeo.


Students were able to set up their own still lifes by choosing from these objects on my window sill or bringing in their own from home. They worked in groups to set up something they could all draw from different seats. Each table created their own compositions.

Scaffolding the lesson: How to teach students to draw what they see

One way to help students to draw what they see is to have them look at and trace the image, using an expo marker, onto an acetate frame  with one eye closed. This also helps in demonstrating how overlapping works and how objects closer to the viewer appear closer to the bottom of the page, while farther away objects appear higher.

Another way to help students learn how to draw what they see is to have them practice 'blind contour line drawing'. In a blind contour drawing the student keeps their eye on the object they are trying to draw and is not allowed to look at their paper until they are done. Poking the pencil through a sheet of construction paper helps them to resist the temptation of sneaking a peek. The drawing is done in one continuous line without lifting the pencil from the page.
We spent an entire class period doing these practice exercises before moving on to our final still life compositions.

How to get an 'A':
Does your composition fill the page?
Did you use overlapping, that is, do the objects in front partially hide the objects in the back?
Did you place objects in the front lower on the page than objects that are farther away to create a sense of pictorial space (background, middle-ground and foreground)?
Is your picture detailed, accurate and neatly drawn?
Is your shading consistent throughout the picture so that the direction of the light source obvious? 
Did you keep in mind that light travels in a straight line? 
Did you include cast shadows on the table surface? 
Did you use curved lines to emphasize round forms and straight lines to emphasize flat surfaces?
 Did you include highlights, mid-tones and shadows?
.
The students below shaded their artwork with pencil and then colored lightly with colored pencil, so that the highlights and shadows showed through the transparent colors.
STUDENT ART GALLERY